
Overview
A CTA (Call To Action) button is the most frequently used feature in order to gather various information about visitors’ behavior. When a user clicks the CTA button, an event is sent to Google Analytics or a tracking pixel. This article covers how to implement the function with Oopy.
0. What you need
We will use Chrome browser and its Developer Tools. Please check the article below on how to access the Developer Tools.


1. Create the events you need
Let's create the event you need for a CTA button. In this article, we will create Google Analytics and Facebook Pixel events.
1.1. Google Analytics
Let’s assume that you set up GA plugin at https://app.oopy.io/plugins. There is no difference whether you set up the GA plugin or write your own installation script at https://app.oopy.io/script without using a plugin.
First of all, let's check if the plugin is installed correctly using the Developer Tools. If you type gtag in the developer console, gtag is valid as below.
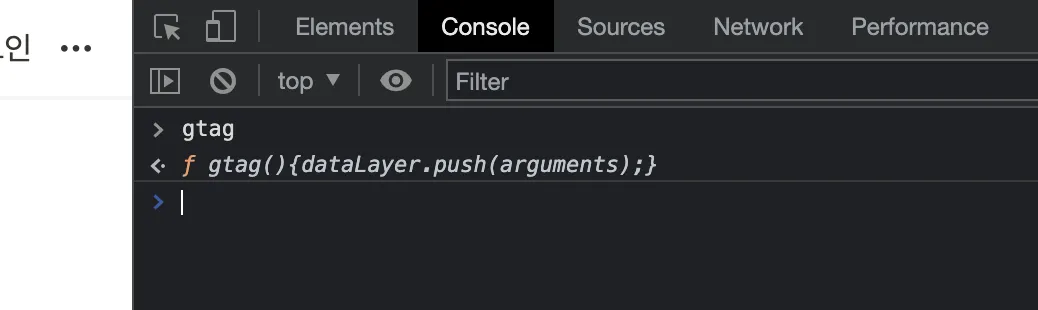
You can see gtag.
If the plugin settings are not properly configured, the following error will be seen. If you see this, you need to set up the plugin first.
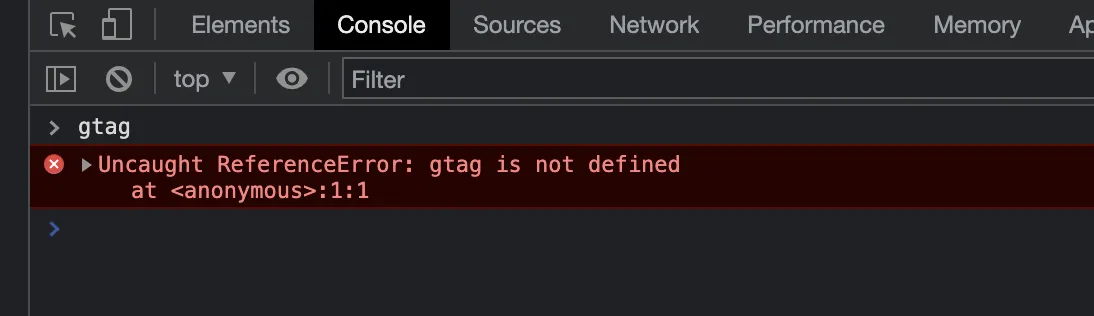
Gtag is not defined. Please set up the GA through the plugin first.
Once you see gtag in the console, we will create the event you need by referring to the official documentation. We don’t cover the setup procedure in this article, so please refer to the official document below.


Referring to the above document, an example event can be defined as follows.
gtag('event', 'cta_test', {
'app_name': 'oopy_homepage',
'behavior': 'click_cta'
});
JavaScript
복사

The actual events vary depending on the person and the situation, so please define the events you want.
1.2. Facebook Pixel
Let’s assume that you set up the Facebook Pixel plugin at https://app.oopy.io/plugins. There is no difference whether you set up the Facebook Pixel plugin or write your own installation script at https://app.oopy.io/script without using a plugin.
First of all, let's check if the plugin is installed correctly using the Developer Tools. If you type fbq in the developer console, fbq is valid as below.

You can see fbq.
If the plugin settings are not properly configured, the following error will be seen. If you see this, you need to set up the plugin first.
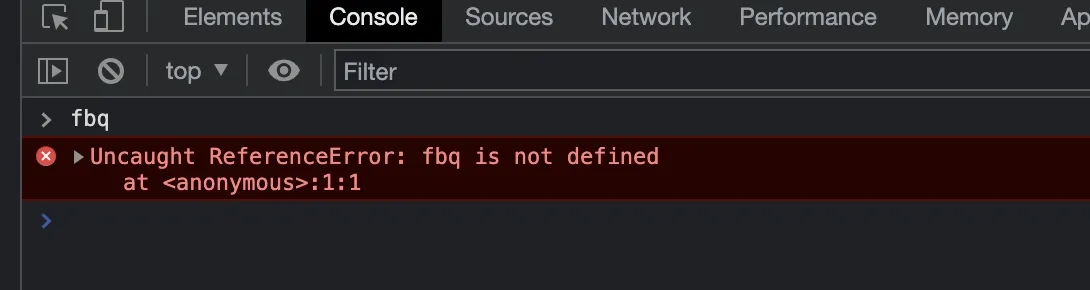
fbq is not defined. Please set up the Pixel through the plugin.
Once you see fbq in the console, we will create the event you need by referring to the official documentation. We don’t cover the setup procedure in this article, so please refer to the official document below.

Referring to the above document, an example event can be defined as follows.
fbq('track', 'AddToCart');
JavaScript
복사
The actual events vary depending on the person and the situation, so please define the events you want.
2. Embed Pre-formatted Code Blocks
Now that we've defined the events we need, embed the HTML code block function provided by Oopy. Oopy HTML Code Block
Oopy HTML Code Block Oopy has declared a variable internally for this case. Simply declare the function as a variable named OOPYctaClickHandler and the function will be executed when the CTA button is clicked.
Let's assume that when the CTA button is clicked, an event is sent to GA.
Please write the code block as below on the Notion page with the CTA button. The location is not particularly relevant, but we recommend placing it at the bottom of the page so that it won’t break the layout of other contents.
<script>
var OOPYctaClickHandler = () => {
gtag('event', 'cta_test', {
'app_name': 'oopy_homepage',
'behavior': 'click_cta'
});
// For debugging. Please remove after verifying functionality
console.log('This code will execute when the CTA button is clicked.');
};
</script>
HTML
복사
On the page above, there is no caption to show the code block as it is, but in order to actually operate this code block, you need to add the caption oopy. (See Oopy HTML Code Block)
Oopy HTML Code Block)3. Verify Functionality
Please wait for the change to be reflected on the page, or request a refresh from the Oopy admin. Now, access the page you created, open the Developer Tools (Console) and click the CTA button.
If you don't see any errors, and console.log works in the code example above then it's working successfully.